This article describes how to develop Firmwares for EnOcean EO3000I based modules with Eclipse.
After using the rather mediocre Keil uVision for too long for developing Firmwares for the STM3xy modules I thought that there must be a better solution, and voila, a day of work later I managed to get everything up and running with Eclipse! Finally autocomplete, indexing and all the amenities of Eclipse.
Here’s how to do it:
In this example, I used the STM31x firmware sources which are available on the EnOcean website.
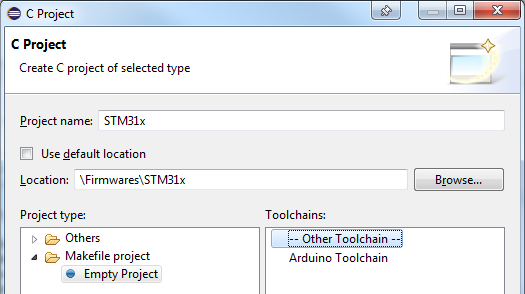
1. Creating the Project
Create a new C project in Eclipse (CDT must obviously be installed) and choose the STM31x project folder as existing location.
Now the project is imported, but there is a lot of work to be done.
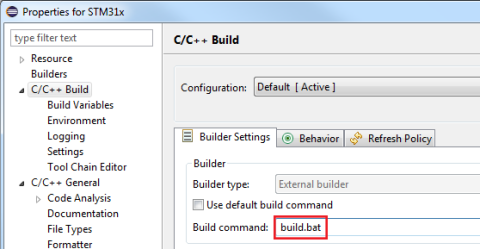
2. Using the uVision builder
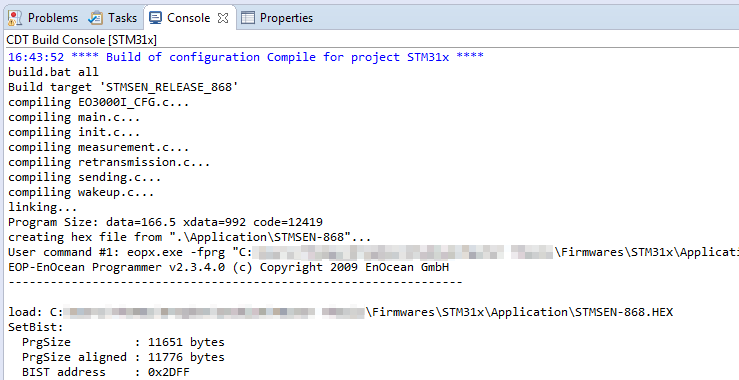
First, we need to use the uVision builder. Instead of doing everything manually, we can just tell uVision to build the whole project via command line (this has the disadvantage that you have to add files to the project in uVision, but saves a lot of hassle otherwise)
Simply create a file called build.bat in the project folder and add this:
@echo off
C:\KEIL\UV4\UV4.exe -b -j0 RS232.uvproj -o "output.log"
type output.log
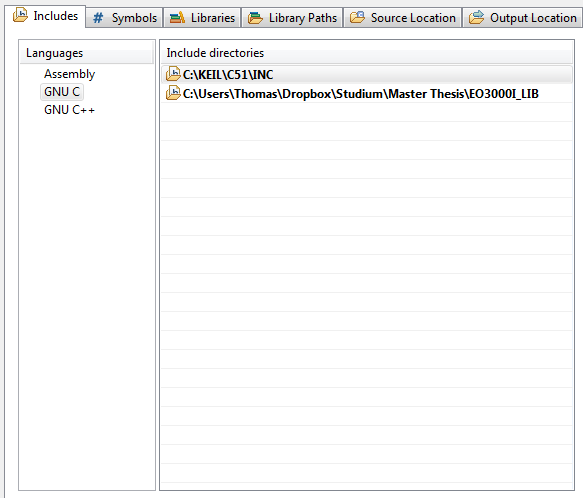
3. Including the libraries

We need to include both the C51 library as well at the EO3000I API. Simply add the paths for the C51 include folder (usually C:\KEIL\C51\INC) and the EO3000I API folder under Properties -> C/C++ General -> Paths and Symbols -> Includes -> GNU C.
4. Adding Symbols
Since the Keil C51 compiler has a few extra keywords, we need to add those too. Also the EO3000I API contains some typedefs that we can also add to Eclipse.
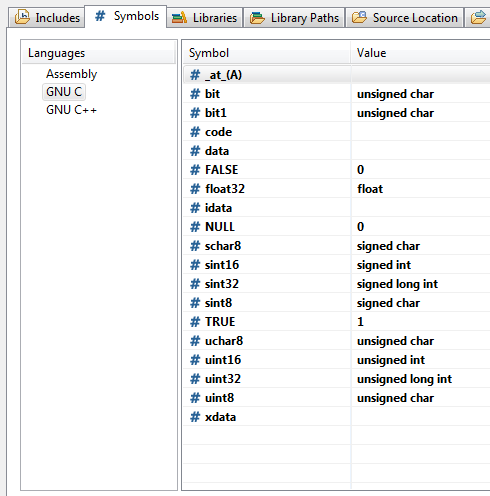
_at_(A), xdata, data, idata and code are from the C51 compiler, the other ones are typedefs from the EO3000I API. To save typing, you can import this XML file here.
Important: the _at_ directive only works without a whitespace and with the brackets, so for example the line
CONFIG_AREA xdata unigcfg _at_ CFG_ADDR;
has to be modified to
CONFIG_AREA xdata unigcfg _at_(CFG_ADDR);
5. Handling compiler messages
For handling the error messages and integrating them into Eclipse, we need a custom Error Parser.
Go to Window –> Preferences –> C/C++ Build –> Settings and add a new Error Parser, then add these rules:
Error      (.*)\((\d+)\):\s+error\s(.*)
Warning    (.*)\((\d+)\):\s+warning\s(.*)
Info       (.*)\((\d+)\):\s+info(.*)
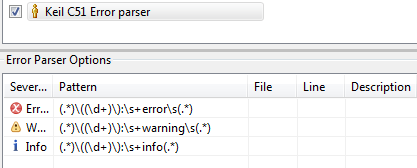
Make sure to activate the parser under Properties –> C/C++ Build –> Settings for the specific project.
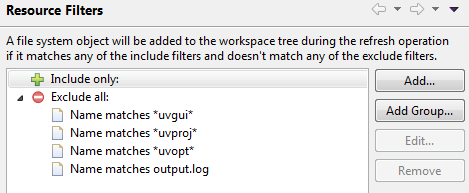
6. Hiding unnecessary files
Since the Project explorer now displays all the files from uVision, we can simply hide them with a few rules. Go to Properties -> Resource -> Resource Filters and add these rules under “Exclude all”.
7. Extra Build & Upload configuration
As an added convenience, we can add another build configuration (under Properties –> C/C++ Build -> Manage Configurations). Name it for example “Build and Upload” and copy all settings from the default configuration. Change the default build command from build.bat to build_upload.bat and create the new file with the same contents as build.bat
Then create the command line for uploading your program in DolphinStudio and add that line to the batch file, for example:
@echo off
C:\KEIL\UV4\UV4.exe -b -j0 RS232.uvproj -o "output.log"
type output.log
echo – ---------------------------------------------------------------
echo Uploading program:
echo – ---------------------------------------------------------------
"C:\Program Files\EnOcean\DolphinStudio\eopx.exe" -port EOVR6XMPA -write -fprg "C:\STM31x\Application\STMSEN-868.hex" -fcfg "C:\STM31x\Application\STMSEN-868_cfg.hex"
Voila, your project should now compile and upload, all from within Eclipse!
Servus Thomas.
Coole Anleitung. Wenn ich das richtig sehe, muss man aber immer noch eine Lizenz für den Keil-Compiler installiert haben. Oder?